Showing posts with label Craft. Show all posts

Tuesday, October 27, 2009

Recycled clock part


Awhile ago I was having fun changing faces on some very cheap Ikea clocks.  Unfortunately my over-enthusiastic efforts led to the first one not working anymore so I pulled it apart and this clear acrylic piece was one of the leftover pieces and I thought it looked like a handy little tray.  I have been using it since then for different odds and ends, usually in Princess E's room (otherwise known as the Aladdin's cave of odds and ends - what is it about little girls and all their STUFF - oh, wait, actually I am still like that.....).

Here is how it looked before after coming out of the clock.


I used my trusty Mod Podge to apply green tissue paper around the lip (I have it raised on a roll of duct tape).


Then I cut out a circle of my Dotty Garland paper and stuck that to the bottom with the Mod Podge.


Here is where it got a little tricky as the home printed paper will smudge if you use Mod Podge straight on it.  So, thinking myself very clever, I used a spray on varnish instead.  Only, instead of giving me my nice shiny finish, the paper just absorbed it.  So, back to the Mod Podge.  I figured the varnish may have set the ink enough to stop it smudging and I was right!  Failing that I was heading to my scrapbook paper stash for another circle.  Aaaanyway, it all worked out and I think it turned out cute for Princess E.  Here is a before and after of her bedside table with it on.

Before....


and After - much better!


Saturday, June 27, 2009

What we do when Daddy is away...


I have been MIA lately because DH has been away on an extended business trip. It is hard for me to get any crafting done myself but here is what I have been up to with the kids to try and pass the time until Daddy gets home. We made this sign when DH went on an extended trip last year (while we were still in Malaysia - which is why the home looks very different). I used an A4 sheet of paper for each letter and drew an outline for the first few and then Princess E took over once she had the idea. She then coloured in each letter, we hole punched the corners and threaded some thick string through. I used Command 3M removable hooks to hang it across the doorway (I love those things!). I hope I kept it and can find it for this welcome home this coming week! Otherwise I am sure Princess E will have fun making another one. Lord A the III might even join in this time.


In the meantime, Lord A has been doing simple sticker pictures (office supply sticker sheets and black paper - he also did some using coloured paper and page reinforcers - the little round white stickers - but I didn't get a photo of that one yet)...this is a great arty craft for the littlies.


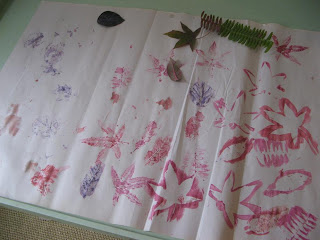
and leaf stamping.


I have had this large box hanging around since we moved last year and it has taken on many forms. It was a house for awhile, then a cave, and here I have set it up on it's side so they could hammer nails into it (the moving carton cardboard is thick enough to provide some resistance but still makes it easy enough for even a 3 yr old). I got this idea from the fabulous Filth Wizardry (don't you love that name?). Then this turned into another game of one hiding inside and trying to grab the nails I would be pulling out for them to hammer again. Then Lord A was playing with it for quite awhile before I checked on him and this is what I found....


He had emptied the shelves of whatever he could find and deposited it in the 'window'....as you do. Little darling...


We also made our own primitive little stamps by sticking adhesive backed foam shapes onto cardboard squares. They don't make the best stamps but it was fun doing them and just mucking around anyway.


We have been cooking our own homemade pizza (doing the dough from scratch - the kids love kneading!). Yum. (forgive the bad photo - taken at night under electric light)


I have also been making jigsaw puzzle sandwiches with the kids for their lunches. Such a simple idea (from Martha) but they absolutely love it! We just used a shaped cookie cutter in the centre and cut out to the edges in a few different spots. The kids love doing the cookie cutter part and then I scramble it before I put it on the table for them to put back together.

Anyway, we have another week to go, and school holidays just started, so my posting will be light on for awhile...

Tuesday, June 9, 2009

Boardgame box tutorial

Update! - see prettier lid here.


Ok, well this is the tutorial that I have been trying to get to for weeks. The half finished box has been sitting on my desk mocking me. Anyway, it is done now and here are the pics to show you how to do it too. Right at the end are the things I learnt along the way and how I would do it differently next time.


This is the poor, sad, battered box beforehand. Such lovely soothing colour combinations too.

I measured the size of the gameboard and then added how much I thought I would need for the game pieces and what height I would need for the sides of the box.


I used an old moving carton for my cardboard but would use a thinner cardboard next time. It threw out my measurements somewhat when I hadn't accounted for the thickness of the walls. I measured out my previous calculations on the cardboard and cut it out, removing the corner tabs. I would have kept them for added strength if the cardboard was thinner. I also scored along the folding lines.


I folded up the sides and added a little piece of strong duct tape to each corner to hold it in place.


Then I added another longer piece for reinforcement.


I placed it on brown kraft paper and cut out tabs for gluing around the edges for a neater finish...


like this. I also glued the paper all over to adhere to the cardboard for a flatter finish.


Here is the bottom of the box with the completed covering of brown paper (I just like the utilitarian look of brown paper but anything would work that you like).


Here is the layout of how I calculated the insert to accommodate the game board and the game piece section with a division between the two.


Here is how mine looked cut out...


Here is how a side elevation of it folded would look. I really only included this picture because I was so happy with my little diagram!


Here it is folded in the box with the game board in residence (I used double sided tape to keep the sides of the insert flush with the box). Now, for the lid, do exactly the same basic box structure and just add enough in the measurements to allow the lid to fit over the bottom box. I had to add a lot to my measurements because the cardboard is so thick but you would need less for a thinner material. Once I had the brown paper covered lid finished I wanted to add the name of the game on top so...


I printed out the title in the font I wanted and then laid it straight over my chosen paper to cut around. I used a good pressure to cut through both pieces of paper so I only had to do this once. If you do this, cut out the inside pieces of a's and o's first.


The completed box! Yay!

It looks so much nicer on the shelf than the regular garish boxes if you have to have them out on display. I think I will add a nice label to the side as well now I see it on the shelf. That would be necessary if you had a bunch of them on a shelf too.

Ok, things I learnt along the way:
- the old saying 'measure twice, cut once' is very, very true. Winging it just doesn't cut it here. Trust me.
- I would seriously recommend a thinner cardboard. Whilst my new boardgame box could probably withstand a hurricane, that sort of thickness really isn't necessary and created a lot of hassle with the measurements. Plus it wasn't as easy to get a pretty finish with the covering.
- I would use spray adhesive to secure the paper to the card after the shape is cut out but before it is folded into place. I just don't have easy access to those sorts of basic materials. I had to use a bunch of glue sticks instead!
- Don't make the measurements for the divider the same height as the box. It needs to be about 1cm less than the height of the sides once folded. Ditto for the sides of the insert.
- As much as I like the look of brown paper I will probably try something a bit more colourful next time - a brighter colour, basic stripe or polka dot would look great. Also, I worry how it will stand up to regular use. I think leftover wallpaper or oilcloth would be a sturdier cover or I might even use a pretty paper and use a spray varnish over the top. One day when I have access to such things I will do another and see how it comes out.

I could see a whole set of boardgames done this way sitting on a shelf all stacked prettily and in full view...

Anyway, I hope you like this and, if anyone else does one, please show me your finished project!

Tuesday, May 26, 2009

Stress relief the crafty way

Feeling stressed, just had to make something with my hands today....


I think I might spray paint the wire a bright colour.....

Tuesday, May 19, 2009

Back again!


Phew, finally back on board.  I have missed you!  I have a nasty staph infection in my leg so haven't been doing much.  I did have to make a gift tag for a present my daughter needed for a birthday party last Sunday so I got inspired and made a little bunch of them.

I used a business card sized piece of card and lopped off the top corners for that classic tag shape.  They seemed a bit big for a gift tag though and I get distressed using too much of any one of my lovely papers (the few that I have!) for something that will most likely be thrown away.  So, after a couple of the large ones I cut them in half lengthways.  There is still ample room for names on the back so I prefer that now.  Just in case you haven't worked it out I only have 4 craft punches so the variety isn't exactly vast!  I quite like the 3D butterflies - it is easy to do by just gluing the body part down and bending up the wings.  I quite like the effect anyway.

For the black card I just printed out the 'to' and 'from' with lines next to them on to orange card, cut out the same shape and joined them through the hole with the ribbon.


This shows my handwritten 'to' and 'from' on one of the other tags.  I am going to make a bunch of these.  The kids go to so many birthday parties here it is good to have a supply on hand.

I have a great idea for a tutorial that I have been wanting to get to for two weeks (at least).  I hope I get to it today....

Monday, May 11, 2009

Moving on....

Well, as predicted, that was one busy week!  Nice to take a breather now.  I have come down with an annoying head cold so laying low this week is just the thing I need.

So, I haven't really done much, crafty wise but just thought I would share a couple of things.


My darling daughter came up with this decoration for our vase and then I happened to spot something almost exactly the same on Apartment Therapy.  What good taste my little girl has!


This is the only other thing I have done.  Another card.  I actually just drew the cage using one of my kid's felt pens but I think it turned out pretty cute.  I really love the saturated colours of felt pens actually (they are underutilised I think).  Not exactly how it was in my head but I like it all the same.  I have more cards needed for family member's birthdays coming up so there may be a bit of a card making glut coming up!  Maybe I should do all of them for the year (well, the half that is left) at once so they are ready and can get posted in plenty of time (instead of me posting them so they would be on time...if I was actually in Australia....).  Ah, the tribulations of being disorganised!

I just had to share this gorgeous card made by my niece.  She is a very talented young artist and you can see her talent for composition here I think.  Is that sounding like a biased Aunty comment?  Oh well, too bad, I don't care!


I have a tutorial in my mind that I hope to complete in the next few days, sick kids allowing...stay tuned!

Thursday, May 7, 2009

My next stamp attempt


Ok, here is my second handcarved stamp attempt.  Actually it is my third but we will just ignore the demonic looking dragonfly for now....


I am really happy with this little fellow (and the cute little gift tag).  Except for accidentally chopping off one of his little toes I think it turned out pretty well, considering the tools I am working with.


I used AuntLoLo's suggestion of an eraser pencil end (with eraser removed and squished a little to form a point) and it worked pretty well.  Nothing like I imagine the speedball lino cutter to work but satisfying for me right now in the meantime.  I am aspiring to become skilled like the wonderfully talented Geninne!

Friday, May 1, 2009

Teabag Tag Tutorial (I love alliteration!)


I am on a tea related roll it seems (see my teacup pincushion from earlier).

Well, this project was inspired by the best present I ever received.  For my birthday one year my wonderful husband cut out a bunch of tiny little hearts and wrote a quality that he loved about me on each one and then put them all in a little box.  How sweet was that!  So, I have adapted this for teabag tags and I did two versions.  One with little sayings of what you love about the recipient of your gift and the other with funny/witty quotes to brighten up their day.  I love both equally so this is definitely going into my list of handmade christmas present ideas.

I have done this as a PDF for download as well.  A few more photos and prettier layout!


Step One
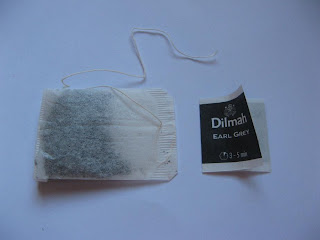
Remove the paper tag from your teabags.


Step Two
Use the teabag tag size for your guide.  You can print out quotes on paper to cut out and layer on pretty scrapbook paper or, as in the plain orange example, you can just cut a rectangle out to fold around the string.

Step Three
I just used a glue stick to glue it all but made sure I got a good squishy dollop on it so it would hold the string reasonably firmly.  You don't need superglue when you consider how long it will be used for!  Warning: just make sure your quotes are up the right way before you glue...and, no, I didn't actually do this but just thought it could be easy to do!

Step Four
Let dry and pop a bunch into a teacup or a pretty box for a personal and thoughtful gift!

Of course, now I have lots of other ideas for variations on this.  You could make the tag into a circle shape or a flower shape or whatever large craft punch shape you have on hand....etc...  I would love to see what anyone else comes up with so please let me know and link back!

Saturday, April 25, 2009

Magnets and crayon rocks

Hmm, these two topics aren't related in any way except I just happened to do both these things yesterday. One successfully, one not so much.....


I saw this cute idea for coin magnets in the latest Better Homes & Gardens magazine so made some straight away. So easy and I have been wondering what to do with the bits of foreign currency we have lying around the house. I used very strong magnets that I picked up at a hardware store and some of the coins were attracted to the magnets so I didn't glue those ones. I would suggest using a very strong glue for these. It makes for a fun reminder of your travels! Could be a cute idea for my homemade Christmas present idea list too. Of course, now I have lots of ideas for other things to stick to my magnets....let me know yours!


I have been coveting these crayon rocks (for the kids of course) for awhile now. I just love them. Love their shape and how they make me want to grab them and draw. Sooooo, being the somewhat crafty person that I am, I think to myself 'well, I could probably make those'. You know, just melt some crayons, wait until they have cooled off a bit and mold them with my hands into pebbly type shapes. Sounds easy doesn't it? Well, it sounded easy in my mind when I first thought about it but in reality, the melting in your muffin tin is easy but waiting for them to cool off to the right temperature and consistency is extremely tricky. Then there is the molding part. Not so easy either I found out! A lot of normal, sane people are saying 'well, d'uh' right about now but I am hard to put off when I get an idea in my head. Anyway, here is my one lonely successfully molded attempt. Too lumpy for me and waaaaaay too much effort (again I can hear the 'well, d'uh' comments!). I think I will admit defeat and just buy the darn things....


p.s. Yes, I did notice that it is rather unfortunate that the surviving crayon happens to be THAT colour and the final result looks somewhat like something left in the backyard......lol (c'mon kids, it IS a crayon, really....).

LinkWithin

Related Posts with Thumbnails