Tuesday, November 5, 2013

Squirrel stamp and ornament

So, I made myself a squirrel stamp.


Then I made a little ornament.  I will try and post tomorrow showing the steps.


I am imagining a little tree full of woodland theme ornaments.  I don't have any woodland themed ornaments so I am challenging myself to make them.  I am going to do multiples of each (I have this thing of having to have at least 3 of every ornament) so I am not trying to think of 50 different ornaments.  Whether I get there or not, well, we will see.  We are lucky enough to be having family visit us for Christmas (SO EXCITED!) and I have a loooong list of projects/cleaning/decluttering I want to get done before they arrive in early December.  I have a bit of a habit of trying to do too much at once.  Like we all do I am sure.  They might be lucky to just find the bed made.  :)

Monday, October 7, 2013

Pinterest Inspired Bench


I think I might have mentioned that I liked the easy instructions I found for making this little Shaker style bench and that I wanted to have a go at it.  I had it all finished a while ago (read: a year) but forgot to blog about it.  Ha ha, don't you love my confused decorating here?  I was just transitioning between Halloween and Thanksgiving so you get both!

Anyway, this is a really easy woodworking project that didn't require anything more than a drill, wood glue and screws.  I had all the timber cut to size at Home Depot but you could do that yourself if you have wood lying around and a saw to cut it with.  As it was, the guy at Home Depot totally stuffed up the measurements so I had to adjust the sizes on a couple of pieces after I started putting it together and realised it looked a bit odd.  Oh, I also borrowed a jigsaw from a neighbour to cut the triangular notches in the legs.

This is where I found the instructions and I strongly urge you to have a go.  It was a very quick project.  It took longer to paint it!

Wednesday, September 4, 2013

Hello

Well, hello there, if anyone is still around. :)


Dropping in with a quick little project I did a few weeks ago.  My wonderful sister and her husband made the trek across the Pacific to come see us (another sister is coming for Christmas - yay!) and I made this pillow for the guest bed downstairs.  I love it!  So cute for a guest bed and helped cut down on the 'twee' I had going on in the room (what better spot to satisfy my secret love of everything granny floral?).

I made a simple envelope cover from a drop cloth (seriously love those things), hand wrote the word on there with a disappearing ink pen and then embroidered it using a simple backstitch and a thicker crochet yarn in a dark pink.  I am sure I could have taken a bit more time and got it more 'perfect' (or, you know, in the exact middle...) by printing out a template, tracing it on or making a stencil yada yada yada but then I wouldn't have done it.  I only have snippets of time to do anything when the kids are home on holidays.  They are back at school as of yesterday so I have a list as long as my arm of projects I want to tackle now... I am working on rehab'ing a tray and freshening up my foyer right now.  Be back soon with the results!

Friday, April 26, 2013

Busy doin' but not bloggin'


While we have been dealing with this stuff (thankfully this is all gone now and we finally have a day above 40 degrees today!  yippeeeee!!!!).......


I was busy doing some inside stuff like hanging this gallery wall in our family room.  It is our favourite room in the house but was a but unloved on the walls and still felt very 'we just moved in'-ish.  Sooo, I finally got busy to stop myself from going CRAZY from the snow still hanging around in April.  I really wanted to only hang things that meant something or that I really love so I can get the most enjoyment from it everyday.  It is a mix of my kids' art, a framed doily my Nana made, the Home sign (which was made for us by our best friend Barry for us to take with us on our international travels and we have hung it in every home so far - it is the first thing we put up), a plate that always hung in my Nana's home, a favourite print from Emily of The Black Apple, a bottle of seaglass collected in Uruguay by another dear friend and gifted to me, seashell art I made fom seashells collected in Uruguay, favourite thrift store finds, etc.).  This wall was blank for a very long time but I put up the picture ledge last September and it has been only the picture ledge with a few accessories since then so this has been a long time coming.  What can I say?  I don't like to rush!  :)  I kid you not though, when my husband watches tv, he sits in a chair directly across from the tv just to the left of where I took this photo from and he DID NOT NOTICE the entire gallery wall (I did it while he as out of town).  After a few hours I just had to ask if he noticed anything different about the room.... sigh...


I have also scored a few thrift shop finds lately.  The above items were bought on a spring break Macklemore style 'thrift shop challenge' ($20 in my pocket...) with my kids.  The picture is a bit dark (it is a dark room plus it has dark carpet) but that super cute mid century bedside table was only $5.99!  So happy with it - it now resides in my son's room.  The globe was $10 and I loooove its soft colours.  I also got a little wooden craft plaque that I want to make into a key hook for near the garage door entrance, a wood and marble chinese checkers game and a tiny little English porcelain plate (I collect them - they are personal salt cellar type plates).


I also repainted my Home sign.  I can't remember if I have ever shown it before but I painted it a taupe colour to match the decor in our apartment in Malaysia for some reason that escapes me now.  I don't know when I will learn that I just like a lot of colour.  I have always loved it but now I LOVE, LOVE, LOVE it in yellow.  That photo above looks a little odd but I just got a new iMac and have always been a PC girl so it is taking some getting used to.  Therefore my old trusty photo editing tools (which I was not very good at anyway but at least I knew how to use them a little bit!) are not around.


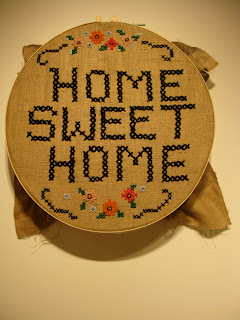
I did this embroidery for my dining room (as part of another gallery wall).  I showed a picture of an oversized embroidery that I was taken with in my last post and I wanted to do one but simpler.  This is certainly nowhere near as large as my inspiration one either (it was 1m [3'] across, this is about 36cm [14"]).  I have never done much cross stitch either so I just did a simple back stitch.  This is the second version as I tried it first with regular embroidery floss but the line was too fine and you couldn't see it unless you were right in front of it.  I used an economical knitting weight yarn for this version and it does show up better but I think I have to have another try at it so I can see it from my kitchen.  I love the yellow but it is still hard to see from a distance.  I am thinking of cutting out felt letters and stitching them on next.  Not ready to give up on some form of yellow yet!

So, that is a quick update of a few things I have been busy with.  Hopefully I will be back soon with some more but my blogging schedule is a bit unpredictable right now (award for stating the obvious goes to me...).

Hope you are all enjoying a glorious Spring/Autumn wherever you are!  I am going to go and stare at the trees and imagine leaves on them...

Friday, February 15, 2013

Favourite Finds Friday

No crafting happened around here this week unfortunately (apart from the kids making crayon hearts for their valentine's for school).  Busy earlier and A has come down with a horrible cold Wednesday and I am fighting it off.  Nothing much happening except domino rally and lego building.  I need to drag the poor kid out to buy some chicken pieces so I can make a big pot of soup (and try out that recipe from last week's list).

So, in no particular order, here are my favourites from this week:


This link from Young House Life where kids describe what they think would make a cool house.  Cute and funny.


I just signed up for their $5 iPhone photography course starting on March 1. 


If you have received your copy of the latest Country Living, this huge cross stitch sampler is featured in a home on the front cover.  I love it!  It is 1 metre across.


I have quite the thing for bunnies and I adore this hook from Anthropologie.  They have a fox too.  I saw this on the lovely blog, My Old Country House when she redid a bathroom and used it there.


These pretty papers are available through Toffee Magazine for $2.50 for an instant download.

These bowls come from Country Road Homewares, a store in Australia.  They have this shape they call Bistro bowls and they bring out new patterns every year.  They have other matching items as well like mugs and my sister has a lovely growing collection of them in different patterns.  I bought two of these in pink (stowing them very gently in our luggage for our return trip) and have been happily using them since.  They just brighten up my morning a bit.  :)


This is a holiday rental in Cornwall.  I have always wanted to visit England and, if I go, I want to stay here!  So lovely and it is right on the shoreline.  I found this through the Hooked on Houses blog.  Be warned if you visit her blog, you will be hooked too!

Hope you are all well and happy weekend!

Thursday, February 14, 2013

Happy Valentine's Day


Well, I am squeaking this post in by the skin of my teeth...  Busy week, sick kids, blah blah.  Anyway, on to the photo.  My sister and her family visited us from Australia last September/October and, on one of our outings, we spent some time on the banks of Lake Superior in Duluth (we all loved it btw!).  It is a very rocky/pebbly shore and I had the great idea that we could all look for heart shaped rocks as I had seen a number of them on other people's blogs awhile ago.  We did find a few but my sister also found this lovely little heart eroded into a big rock.  So I will leave you with that and save my 'bah humbug' anti-Valentine rant for another day.... :)

Saturday, February 9, 2013

Cabin fever 2013 - pinch pots


My favourite side effect of winter is the kids' renewed interest in doing crafts together.  They tend to avoid it in the summer when they can be outside all the time and I miss doing these things with them.  Recently at school A made little 'pinch pots'.  A regular 1st grade item apparently.  For those of you without little ones to tell you, a pinch pot is just a clay pot molded by hand from a blob of aforementioned clay.  You can get them quite smooth if you keep a little bowl of water close by and dip your finger in.  Decorate however you like (I have a big jar of random beads and another of sequins that have been our decorations of choice).  I am guessing you can paint them once dry but I kind of like the natural colour.  The school one was painted and kiln fired (yellow! so cute).  I bought a big bucket of Crayola's air dry clay from Target (the kids' art and crafts projects section) and ours dry in front of the fireplace.  I am not sure what we are going to do with them all (be warned relatives back in Australia with birthdays looming...) but we have quite a row of them on our dining room windowsill.  I love that this is such an easy craft to set up as well.  Just grab the bucket of clay and a few embellishments and pull out your chunk of clay to work on.  I think I need to buy more clay.

Friday, February 8, 2013

Favourite Finds Friday

I wasn't kidding about my love of alliteration the other day (I am sure I have mentioned it many times actually....).

To finish up the week I am just going to share a few random things I came across this week that I enjoyed.


I just bought this great 'Hogsmeade Retro Travel' poster from Poster Revolution.  E is a huge Harry Potter fan and this poster is only $4.80 today (don't know for how long).


I am going to try out Smitten Kitchen's chicken noodle soup recipe - it looks fantastic.  I should try more of her recipes as they all look wonderful.


This image comes from a wonderful blog that you have probably already heard of, Posie Gets Cozy.  Alicia writes so beautifully and creates the most heart achingly gorgeous things.  But I just love this photo of some vintage wallpaper swatches.  That yellow one has me drooling.


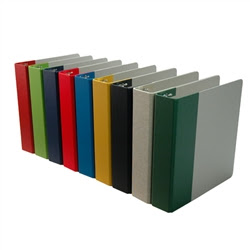
Loving these cool eco friendly binders from Naked Binder.


Isn't this adorable?  I love this little woven heart valentine from Mini-eco in the UK.


Last but not least, I love this free printable colouring page from Gerbera Designs - it comes blank and you colour it in however you like (obviously...).  I am going to do one for each of the kids.

What have you discovered this week?  Do you overuse the word 'love' in your descriptions of things??  Feel free to share in the comments!

(disclaimer: none of these links/opinions are sponsored or affiliated in any way, none of these websites or people probably even know who I am - these are just my personal opinions of things I have come across in my internet browsing travels this week)

Thursday, February 7, 2013

Thrift Store Thursday


Look at this lovely lady I picked up the other day.  She is a brass bell.  I haven't found much info online about her but the cheapest I saw it sold was on Etsy for $17.  So I am counting my $4 pickup a bargain.  I am very discerning about what I buy at thrift stores now - I bought too much when I first got to the US and discovered these fabulous places close by me - and often leave with nothing.  But I just love this and I couldn't leave her there.  I don't even like anything gold normally.  How about you?  Picked up anything fab lately?

Tuesday, February 5, 2013

Receipts running rampant....

That post title makes no sense but I have an unrelenting love of alliteration and try to fit it in anywhere.  In the spirit of the usual New Year goal of getting more organised, I did a little makeover of my receipts folder.  Living the dream over here, let me tell you, and yes I am just going to ignore the fact that my last post was still a Merry Christmas one....  ah, things have been busy.  We went for a visit back to Australia for 3 weeks and I don't like to post about it online beforehand, for security reasons, but that was a welcome break from the cold up here in Minnesota.  After that we had school camp to get ready for, hubster travelling for work, everyone but me coming down with the flu, the start of gymnastics meet season, yada yada yada.  You all know how it goes.  Another thing that has been getting in the way of me posting has been the difficulty I have found in finding a spot to photograph my projects adequately in this house.  This has been an ongoing source of frustration but I have just rigged up something that seems to be working.  I will post about that another day so you can feel free to copy my amateurish ways...ha!

Ok, well on to this makeover I mentioned.  I have had this receipts folder for umpteen years and it irritates me.  Always has.  You know how sometimes it is the little things that just get under your skin?  Well, ridiculous as this is, this little folder which I use quite regularly just hasn't been functioning great and it is a source of minor, but present, irritation so I decided to just do something about it to bring some pretty functionality into a mundane task of my life.

You can tell how old it is by the red Dymo tape label on it - yeah baby.  Those things are probably collectible now.


First things first, I really didn't like the flap so I cut it off as close to the hard cardboard shell as I could.


Then I chose a cute patterned scrapbook paper to glue to the outside covers, measured the exact width and made it a little longer (top to bottom) so I could fold it over on the inside for a neat finish.


I used Mod Podge but you could use any glue you have to hand (a glue stick would work fine).  Spread your glue on quickly and....


press it onto the side.


Here is that little bit of overhang.  I used a regular glue stick along the edge and folded it over to the inside.  Just held it for a few seconds and it stuck fine.


The inside was still looking like a hot mess thanks to my oh so beautiful sticky notes stuck over printed labels so I wanted to make this look a little nicer too.


I grabbed another piece of scrapbooking paper and cut off a strip that I thought would be wide enough to cover up the printed lettering on each little flap.


Then cut them into little rectangles, folded them in half......


slapped a bit of glue on it.....


and added it to each flap in the three sections.  This looks fiddly but I just eyeballed everything and it went really quickly.  I may or may not have made sure each piece of paper was lining up the same pattern of lines...


Then I got out my trusty label maker and added labels that I will actually use.


This little folder lives on a shelf above my computer so I added a label to the end by poking a hole through on the side and tying this little hanging tag on there.  I bought some cheapo letter stamps at the Target dollar section a little while ago for the kids and used it here.  I am claiming a quirky charm to it rather than admitting my stamping effort looks a little wonky.


I might make an elastic band to go around it if I find it needs it but it doesn't usually get full enough to warrant anything like that.

So, there you have it.  A quick and easy little office update which I am sure will make me smile just a little bit every time I use it and, really, who doesn't need more little smiles in their life? :)

LinkWithin

Related Posts with Thumbnails