Wednesday, December 12, 2012

Merry Christmas!

Hello there!  Yes, I am still alive and kicking over here.  Wow, didn't quite mean to take that much of a break but there you go, life happens.  Between some residual health issues and the constant round of school, kids' activities, having to feed people and so on, the time just slipped away.  Honestly, that is going to be my one New Year's resolution - slow.life.down.  There must be a way that doesn't involve going to live in a remote cabin in the woods and removing yourself from civilisation (as tempting as that sounds some days!).  Humour me, tell me there is.....

Well, I am just dropping in to show a couple of quick Christmassy projects I did around here and then I won't be back until the New Year.  I hope you are all having a wonderful, wonderful holiday season - no matter how fast it ran up on us all.

My first quickie decorating project involved this awesome thrift store find - this beautiful apothecary jar for a mere $12.  I have managed to find a reasonable number of small ones in thrift stores but I am in love with this larger beauty.  Miss E and I very quickly and simply decorated it with epsom salts in the bottom for snow, a little miniature tree I had picked up at Michael's awhile ago (with just this sort of project in mind) and a couple of Schleich animals from the kids' collection.  Then I tied a little snowflake patterned ribbon to the top knobby thing.  A white and silver glitter pompom may have made its way in there too. :)


I have this sitting on the little bookcase I use for our very small front entrance next to one of my blue mason jars with some sticks decorated with glittery little birds and shiny and glittery stars.  Last year I tried to wind tiny little battery operated lights onto these branches and they were a royal pain and they didn't look that great except at night when they were lit (plus they went through batteries like nobodies business) so, obviously, I didn't use them this year again.  I prefer them without anyway and am glad that A didn't remember them because that boy sure does like a string of lights!


One other touch I did was to take my boy scout troop fundraising wreath (say that 3 times fast) with the big red bow and just changed out the bow so it didn't clash with my orange front door.  Yes, I painted our front door orange.  With our landlady's blessing.  She is awesome like that and I am glad because it makes me ridiculously happy every time I drive home and see it welcoming me.  Now I just need to paint those little red bells on the pinecones.... or not.  Probably won't get done if I'm honest. :)  The bow is big enough to distract from that anyway, right?  Plus, who cares???  We aren't talking about heart transplants here.


Lastly I had a go at some chalkboard art on the kids' easel which sits in the corner of our dining room (I googled chalkboard message images and found this one but cannot find the link now).  I have taken to drawing and writing seasonal messages on it.  I love looking over from the kitchen to the dining room and seeing the pretty words (which look better from a distance - you can't notice the mistakes then!).  Not sure what quote I will put up for the New Year.  Got any favourites?  Please share!


 Anyway, those are a few of my simple little touches around our home.  Simple little touches are all I can manage this year but I kind of like it like that.

So I will sign off for 2012 now and see you in 2013 (barring any disasters on the 21st...)!  :)

Tuesday, July 31, 2012

DIY Felt Tablet Sleeve


I was lucky enough to get a tablet as a gift this last Christmas and, after a while without any protection save the odd magazine, it was in danger of getting a bit beat up in my bag.  I was looking around at cases and kept on seeing all these lovely really thick felt tablet cases (sleeves?) around that I liked but I didn't want to spend the money they usually sell for.  They are generally made of really thick wool felt which is beautiful but is quite expensive to buy for the home crafter (3 sheets can be around $18 and up).  So, I decided to make mine out of 29 cent craft felt sheets instead which happen to be just the right size.  Yay, I love a bargain solution!

You will need:

4 sheets of craft felt
Sharp scissors
Sewing machine
Ten minutes of your life


1. Line up 2 craft sheets on top of each other and stitch a straight line across the top leaving a small border.  Do the same with your second 2 sheets.  These individually stitched sides provide the opening when the other sides are all stitched together.


2. This shows your two sets.  Don't worry too much about lining them up perfectly as felt sheets are rarely exactly the same size.


3. Lay one stitched set on top of the other set in your chosen colour combination and pin the heck out of it so it doesn't skew too much when you sew it all together.


4. Stitch around the outside 3 seams and not the top one where you have already stitched obviously.  I used generous seams because my Asus tablet is smaller than an iPad.  I think with smaller seams the iPad would still fit (someone try this out and let me know!).


5. Use your sharp scissors to trim off the seams all around and give you a nice clean edge.  That's it, you are done!

For another one I made, I used pinking shears for a more decorative edge. 


On this one, I chose yellow for one side...


and grey for the other.  Going with the whole colour blocking trend right now.  I am so hip... ;-)


I really like the colour effect on the trimmed sides and the double thickness on each side makes it nice and sturdy.  Best of all, because it is so cheap and quick to make, if I want a different colour combination it is no hassle.

Friday, July 13, 2012

Fabric samples from Spoonflower


I recently received some new fabric swatches of my designs from Spoonflower.  I am really happy with how the grey and blue graphic ones turned out but I think I will re-work the daisy flower one.  The background was too pale and the effect was kind of lost.  What do you think?  You can buy yardage of my designs here if you like!  (There are only 3 designs being offered publicly as yet but I will be adding more regularly).

Happy Friday everyone!

Wednesday, July 11, 2012

Strawberry and nutella crepes


It is Miss E's birthday today (10!!  holy cow!!) and she requested crepes for breakfast.  Just like the strawberry ones from the Original Pancake House.  Oh good.  No pressure.  We looooove the Original Pancake House and we love their crepes.  I have never made crepes but was inspired by my good friend Melanie when she whipped up fresh peach crepes for breakfast (with bacon on the side mmmm.....) when we stayed with them on our way back from Kentucky.  Oh My Goodness, they were good.  I am a decent cook so I gave it my best shot and I think they turned out great!  We all feasted on these for breakfast and I was satisfied when Miss E declared them the best birthday breakfast ever (awww, way to warm your mama's heart).  Miss E customised hers with a slathering of nutella on the inside before we piled on the fresh strawberries.  I had mine without the nutella but they were good either way.  Here is a link to the recipe I used.  The only adjustment I made was to add a splash of vanilla and I doubled the recipe (we have enough for leftovers for the kids tomorrow morning - yum).

Saturday, July 7, 2012

Match bottle


I saw this idea awhile ago but I can't remember where I saw it.  I thought it was a genius recycling idea and I just happened to have a little bottle sitting around the house that I hadn't recycled yet (I am a sucker for cute bottles).  I am pretty sure the original had an engraved bottom for striking the matches on but I don't have a dremel so I used the striker on the side of the matchbox and affixed it with double sided sticky tape.  Works great and looks cute!


Friday, July 6, 2012

Shaker Village in Kentucky

Well I have been AWOL for a bit longer than I thought but am back now!  My family and I actually just did a big road trip and saw some of the good ol' US for ourselves.  It was a blast and the highlight for me was staying at the Shaker Village of Pleasant Hill in Kentucky during our trip.  This is a place that I have wanted to visit for a long time and it didn't disappoint at all (despite E and I getting violently ill on the morning we were supposed to leave - ugh).  It is a BEAUTIFUL place and I want to just move right in and live there pretty much.  I know my Mum and sister's would love it too.  I took so many photos (about 400!) so I have whittled down as many as I could to give you a little look at this spectacular place.  I am already planning a return visit next year.
   
 The tree lined centre road (turnpike) of the village that is only for pedestrians now.

They had these lovely wooden benches dotted everywhere, sometimes accompanied by a table.  Don't even get me started on the white fences everywhere.  So beautiful.

The east family dwelling where we stayed.

The windows everywhere had deep sills and these simple white linen curtains (this window was in our room).  Perfection.

A door to the central meeting house.  They work very hard at their restoration work here and do it beautifully but I also think there is beauty in the old peeling paint.

Another bench and some of the miles of stone fencing everywhere.

View of the Central Family Dwelling from the Meeting House across the way.  This building is made of 2 foot thick limestone from basement to roof top.  Note the two gates and two doors.  One for women (left) and the other for the men.  They had separate staircases inside too.

Like these.  This is a view of the hallway heading to their common meeting room.

Part of the basement kitchen area in the centre family dwelling.

 One of the bedrooms - love those rugs and bed coverlets (hand loomed on the property).

 Love the simplicity of this bedroom.


Gorgeous and very tall cupboard in a bedroom with a stool.

 I loved this big old cupboard in the baking room.
  
 Beautiful upper hallway in the centre family dwelling (my favourite building).
 
The kids got to pat a baby goat....

and play on a wooden swing (there is one of those benches again - seriously want one or three)...

 and stand on fences at dusk while we waited for the fireflies to come out.

Best time ever.

Thursday, April 19, 2012

Thrift Store Thursday plus the Tooth Fairy


I haven't been to the thrift stores that much lately and I have been very selective about what I buy when I go.  I am in the process of decrapifying my house and I just don't feel like bringing anything more in.  More on that in another post.  Having said that, I couldn't resist picking up these large embroidery hoops as I am planning on using them to make some wall hangings for above our very bare bed.  The June Tailor thread spool rack will come in very handy on my sewing table (and it was only $4.99 - they retail for $18 - so score!).


A lost his second tooth the other night in bed so he put his tooth in a little box under his pillow only to NOT find any money the next morning.  Apparently, the tooth fairy couldn't get in because I had locked all the doors and windows *whistling innocently*.  Lucky we remembered to put out the 'tooth fairy key' (a key I had covered in glitter awhile ago with a pink ribbon hastily attached) last night so she could make her way in and deposit the cash... :-)

Saturday, April 7, 2012

Happy Easter!


This photo comes from one of my favourite new blogs I discovered, Always with Butter.  Beautiful recipes and beautiful photography.  This post from Easter last year just kills me.  I want a bunny!!

Tuesday, March 27, 2012

Seed Packets - Free Printable


In honour of my wonderful Nana (who used to tend a lovely garden which holds many wonderful memories for me) and the arrival of Spring here in the Midwest, I have created these little printable seed packets for any other avid gardeners.  Of which I have to admit I am not one.  In my mind I have this vision of peacefully tending a well kept garden that flows with floral and edible abundance (as birds twitter and frolic about me! ha ha).  The reality, probably not uncommonly (we all have our little delusions right?), doesn't match at all.  I quite enjoy gardening when I do it but I can't say the overwhelming desire to do it more than haphazardly has overtaken me so far.  Although, I have kept a geranium inside and healthy over the winter so there is hope for me yet. :-)

Enjoy, you green thumb types!  

Wednesday, March 21, 2012

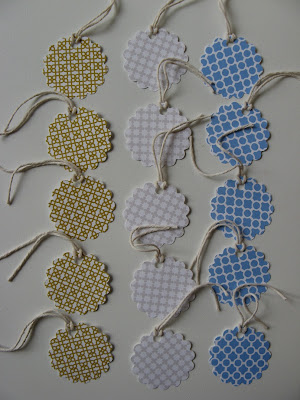
Scalloped Gift Tags - Freebie included!


Want a whole slew of pretty gift tags to keep on hand?  As my older followers would know, I am quite partial to designing free printable papers around here.  I love to print them out and do stuff with them and lately I have been enjoying making these gift tags to keep a stash handy.  Only problem is I really don't like all the ink I end up wasting (or, really, having to hold on to the remainder of the sheet until I think of another use for it) on the full sheet of printed out design.  So I made this paper with three different patterned strips that I could cut down and use with my scalloped circle punch.  That way I get three different designs for one sheet of card rather than having to print out 3 sheets if I want a variety.  So, you will need:

printed sheet (download here), scissors, scalloped (or plain) circle punch (2 inch), hole punch and string.

Cut the strips to just below the design on one edge (so you can line up the punch easily).

Line up your punch and cut out along the line...

...until you have a nice little pile of tags.

Hole punch and add string. 

Keep going until they are all done.  Cute huh?  I am giving them away as present fillers too.


Other news around here.  I have started on ripping off the fabric on my bench seat finally.  As I suspected, the construction is pretty cheap but that is fine for what I want to use it for.  I need to pull it apart to get some of the fabric off and I need to buy a staple gun for the reupholstery part (I really thought I had one already...).  I will have to do it at night down in the basement though.  A was very upset to see the 'lovely flowers' going.  He actually cried and asked me to glue it back on!  Sorry, son, not on your life.  Trust me, it will look much better once I am done with it.  He is a funny boy - gets so attached to the strangest things.  Miss E meanwhile very matter-of-factly commented as she walked past 'oh, thank goodness you are getting rid of that hideous fabric'.  That's my girl.


In fear of jinxing it, I do believe Spring has arrived and is here to stay (yippee!).  Our pussy willow tree is always the first to flower it seems (she says as a veteran of two Minnesotan spring's - including this one..lol).  Last year when it flowered it was so fast and then, bam, it was covered in leaves and the flowers were gone.  Quite the quick lady.  Looking forward to the flowering fruit tree in another part of the yard too.  I have no idea what fruit it might have been - last year just as it burst into flower we had a gigantic storm that stripped them all off! Seriously, the flowers were all open and delightful for a maximum of 3 days I think.  It might just be an ornamental variety too of course.  I don't have a clue really.

How is Spring or Autumn in your neck of the woods?

Tuesday, March 13, 2012

Antique hoop stand


Nearly two years ago now, our wonderful (and very missed) housekeeper that we were lucky enough to have during our stay in Uruguay (hola Paola!!) gave me this unusual piece she picked up at a market.  We think it is an antique embroidery hoop stand.  I really can't think of what else it could possibly be but if you can enlighten me please go ahead.


So, I have been meaning to do an embroidery panel for it for ages and I have finally completed it.

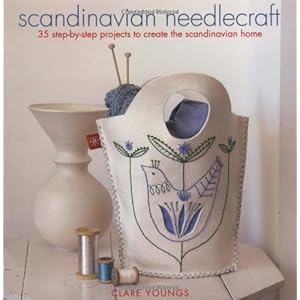
Scandinavian Needlecraft: 35 Step-by-step Projects to Create the Scandinavian Home 

I got this pattern from the lovely book 'Scandinavian Needlecraft' by Clare Youngs.


Now it can sit happily on our piano (this is a very dark room in our house so I attempted to finagle my own home style Lightscoop (see below) for this photo).  After I iron it... ha ha, just popped it in there for the photo but need to iron it obviously.

By the way, have you ever heard of the Lightscoop?  I first saw it over at Chez Larsson.  I don't have a camera that it fits but will buy it as soon as I upgrade my camera sometime this year.  Anyway, in the spirit of necessity being the mother of invention, I decided to try taking a photo using a mirror held up at an angle in front of the flash.  This would have worked better with the camera on a tripod but I was just doing a quick photo and didn't get it out.  Here are three photos comparing how it worked.

 using the flash directly
using natural light

using the mirror in front of the flash to 'bounce' the light off the ceiling

I didn't do any photo processing on these photos so these are raw (and very hurried - forgive any blurriness).  You can see how the light is definitely more diffused and even.  I think the proper Lightscoop would work better (you don't have to balance it and risk blurry photos for a start) but, in a pinch, this will work for me in the meantime until I can buy it.  By the way, that display shelf for the mini figures?  Only 79c at the local thrift store!  I am going to paint it this week and make it look all pretty.

Disclaimer: none of the links provided here are affiliate or sponsored links - just my own opinion on things I have bought or seen.

LinkWithin

Related Posts with Thumbnails