Monday, November 30, 2009

....and the Winner is

ZACHSGRAN!

Congratulations to Zachsgran (as well as Zach!) - commenter number 6.  I will send you an email today to get your details.  Watch out for more giveaways here because your chances are very good!!  Ha ha!

Thanks CSN stores for offering this giveaway too.  I am sure young Zach will enjoy the Doctor's kit immensely!

p.s.  I used Random.org for the draw but can't work out how to get the picture of the number generator on to my blog!  Any hints would be appreciated.

Wednesday, November 25, 2009

Giveaway in time for Christmas!


WIN ME!

Yay, a giveaway in time for Christmas!  I don't know about you but I do a reasonable amount of my shopping online because of my location.  It is quicker, cheaper, easier and the selection is better for where I live (no offence Uruguay!).

I was recently contacted by the lovely people from AllModern (CSN Stores) who have offered to send one of my US or Canadian readers this super cute toy Doctor's bag that I think would be a great present for some little person you might know.  I love that this one is made from all environmentally friendly products too.  If you want to skip my rundown of fun things I found go to the end of the post for the giveaway rules!

You should see some of their other cute kid's stuff.  How about this gorgeous and simple little Noah's Ark giraffe by Koko Company?  So adorable!


This Groovy musical instrument set by Wonderworld is adorable too.


I really like this narrow to wide puzzle by kid O.


and don't get me started on how much I love this 'Sparrow' storage bin by DwellStudio.


But, I have saved the best for almost last.  While I have been looking around their AllModern stores I came across THESE.  They are Herman Miller Limited Edition Walnut Tops.  These weren't in the kids section by the way!  Oh. my. gosh.  I LOVE THEM.  Seriously, I want them very badly.  Just because.  Saving my pennies for these!


Last, but not least, you should go and check out one of CSN's other online stores http://www.holidaydecorationsdirect.com/.  My tree theme for the last few years has been red and white pretty much exclusively (until I get sick of it - no sign of it abating just yet).  I thought these (yes, these, because I always buy at least 3 of each design!) might look nice in my collection.  Isn't this gorgeous?


Aaaaanyway, as you can see, I was quite impressed with their selections and I could go on and on with items I found that I liked.  Let's get down to the giveaway!

The giveaway is open only to US and Canadian readers (sorry everyone else!).  Shipping is included.  If you would like to win the toy Doctor's set just leave a comment here between now and Sunday evening (comments close at 9pm my - Uruguay - time which is 6pm New York time).  Check the time for your time zone!  It will be earlier in the day for you if you live towards the west coast.  Make sure you leave a contact email if it isn't in your profile.  The winner will be selected by Random.org. and will be announced on Monday, 31st November.

Disclaimer:  I have not received ANY compensation by way of money or products for posting this giveaway.  I was just happy to pass on a freebie for my readers.  I do not have personal experience of shopping with this company but plan to in the near future!

Tuesday, November 24, 2009

Christmas sacks


This is how I am going to be using my printable Christmas paper this year for little gifts for my friends (maybe I will stuff them with some decorated cookies).  I made the little sack just like my gift bag with one change.  I didn't bother folding the top edge of paper down to reinforce for hole punching as I just folded down the top twice using the peg to secure (like a little lunch sack).  I then cut out a tag shape and used my snowflake stamp.  I love how these turned out!  My other ideas include card making (of course), present wrapping, printing on card to make gift tags, ball ornaments and paper lantern ornaments.  I might even try to make those gorgeous little origami boxes I have seen around the place.  I would love to see other ideas for the paper too so make sure you let me know how you use it.

Monday, November 23, 2009

I told you I couldn't stop...


covering jar lids that is.  I love them!  Ah, such simple pleasures...  This is my collection so far but I have more in my sights.  I am going to make a set for someone for Christmas, I am going to use a set as money management jars for Princess E (now that she gets an allowance), I am pretty much just going to keep covering them until the cows come home really!

Free printable - Christmas snowflakes and spots - red


Here is the first (I hope) of a series of Christmas printables.  I will be posting this same one in blue shortly.  Any other colours anyone has a strong preference for?  Click below for the free download.

Christmas snowflakes and spots in red

Saturday, November 21, 2009

Post-it note cozy

I have officially given up on my handmade Christmas this year.  The sheer frustration of not being able to find the exact materials I need combined with having to be organised enough to get things finished weeks ahead of time to post got the better of me!  What I was intending on doing was making about 5 to 6 small/medium items for each person and presenting them kind of 'bento box' style - all in cute little boxes in one larger box.  I should add here that my handmade gifts were only going to be made for my Mum, sisters and nieces so I wasn't planning on making 100 of these or anything.  There are some things I could have completed quite easily so I am going to feature them over the coming days so you can use them as stocking/present fillers too.  My family hopefully will have forgotten them all by the time they receive them next year (if I haven't changed my mind of course)!

First cab off the rank is this little post-it note cozy (how do I add in the TM symbol next to that??).  Very simple idea but looks really cute.


Firstly you cut a piece of paper the exact width of your post-it note block and the necessary length to wrap around and provide some overlap.  My paper length was 20.5cm.


Next, place your block on top off centre so that there is a longer flap to fold over the front.  Make some preliminary creases where it will wrap around and then crease them sharply.


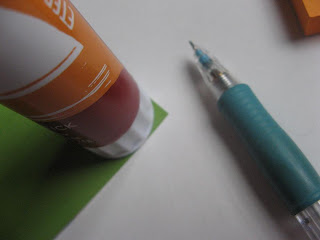
I also rounded off the corners.  If you have one of those nifty round corner craft punches that would be perfect but I don't so I just used my glue stick as a guide and cut the corner off carefully.


At this point, apply glue to the back of your post-it note block and stick it to the paper.  Grab some adhesive backed velcro dots and stick two opposing dots together on one side of the flap then stick it down so they line up perfectly.  I think white velcro dots might look better with a lot of patterns but black was all I had.


Close your cute little cozy and you are done!  This would be cute with a nice pen as a gift for a teacher too I think.


Friday, November 20, 2009

Dust jacket - recycle kid's art


I just thought of a new use for some of the HUGE volume of art that kids tend to produce.  Book dust jackets!  I just cut this painting to the exact height of the book and made sure it was long enough to wrap around and fold on the inside of the front and back covers (to see how to do these cotton bud [q-tip] paintings click here).  Easy peasy.


Once I have done more of these I will print out some nifty little labels with the book titles and authors on them.

Sunday, November 15, 2009

Fairy mushrooms


Look at what we found in our garden today.  This is the most wonderful mushroom I have ever seen!  It is about 20cm (8in) tall and seems to almost glow (maybe it was the funny light under the tree).  I thought it looked like the perfect fairy mushroom...


Anyone have any idea what sort it is?

Friday, November 13, 2009

Pretty jar lid tutorial


We have a bit of a glass jar obsession in our family.  Well, actually, it is probably more my Mum than anybody.  With me a close second I think.  I have paid $10 for a jar of jam mostly because I wanted the jar!  The jam was yummy though... (don't say a thing B!)

Anyway, this allows me to keep any old jar I like the shape of and have a pretty lid now.  I should learn to spray paint properly (I am too heavy handed) - I am sure they would look great in pops of sunny yellow or turquoise blue or whatever your favourite colour is as well.

Here is our bland jar before.


Firstly I cut a circle out of some thin scrapbooking paper (the really thick ones won't work as well - if at all).  I made sure I cut the circle big enough to fold down the sides and just under the lip a teeny bit.  Don't worry about being to accurate as you can trim it later.  Glue the lid to the centre of the circle.  You will need to smooth the paper with your fingers to make sure it sits smoothly over the indentation that most jar lids have.  Snip the paper ever cm or so around the edge so you can fold it down smoothly.  Brush glue on and press each little piece down around the lid.


Until it looks like this.  I have folded the paper over the lip so you won't see any white from the jar lid.


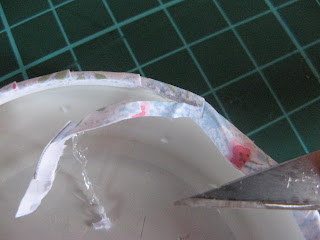
After you have let the glue/Mod Podge dry a bit, use an Xacto knife to trim inside the lip.


Then I added two coats of the glossy paper Mod Podge to the outside.


No jar will be safe around here now!

Thursday, November 12, 2009

Scrap busters

(Imagine all of the following dialogue is in a 1950's advertising voiceover - makes it more interesting!)

Do you ever end up with little paper scraps like this after projects?


Well, if you hate to throw away scraps as much as me, get out your trusty craft punches and go to town!


Then pop your punched out shapes into a trusty tin and you will always have them on hand for the next emergency craft session!


(how weird, my craft mat looks blue in the last photo - hmmmm......)

Wednesday, November 11, 2009

Present for a teen


I am very fortunate to know one of the loveliest thirteen year old's on the face of the planet and this present was for her.  I made a little needlebook with her initial and a felt flower embellishing the front (following my basic instructions from here), a stitched notebook with an elastic closure, some covered bulldog clips and a paper covered pencil (paper glued on with Mod Podge).  I put it all in my reusable gift box.  I am so glad she loved it.  For a long time I avoided giving homemade gifts because I thought they might look too hokey or wouldn't really be well received so it warms my heart so much to know people who really appreciate the thought and effort of a handmade gift.

Here are a couple of photos just to show you how I added the elastic closure to the notebook.  I cut two slits in the back cover (just wide enough to slip the elastic through)....


slipped the elastic through, stitched the elastic together on the inside ....


so it looks like this:


and then you can just pop it around to the front to hold your notebook closed.


I embellished the front with punched flower centres and butterfly, I cut the scalloped flowers out by hand (you have no idea how much I would like a scalloped circle craft punch - in many different sizes in case anyone who buys me presents is reading this!) and I drew the stems and leaves with a fine point black felt tip pen.

Now, onto my ever burgeoning list of Christmas presents!  As Matsutake says, No sleep til January!  lol.

Tuesday, November 10, 2009

A tad late...

Okay, a lot late.  I will just quickly share some very late halloween piccies before I move right along.  We had a late notice (and small) Halloween pumpkin carving party at our house two days before Halloween so I had to come up with some very quick ideas for food and decorating.  Not growing up celebrating Halloween I had to rely on Google to come up with some ideas.    I made a layered dip (refried beans, salsa, sour cream, grated cheese & guacomole) and drew a spider web on top with sour cream.  It is a very lame spiders web but I was in a rush and having a mental block obviously!  I couldn't even find a plastic spider to lend some help here...


Then we had 'Pizza Mummies' - I don't have a photo of ours but here are the ones from Disney Family Fun.


Their recipe suggested using english muffins as the pizza base but I just made up my own pizza dough and the kids got to roll out their own mini pizzas and decorate them.  I also used green stuffed olives for the eyes.

Me and my trusty helper (Hi Tori!) decorated bought mini meringues as little ghouly ghosty things (I lined the plate with black paper cut out with scalloped edge scissors).


My aforementioned trusty helper also helped make 'witches wands' (I, again, forgot to take photos so here is the photo from Our Best Bites where I got the idea).  Our Best Bites had some excellent suggestions so I highly recommend you click on that link and check them out.


These are the desserts - little chocolate pudding 'graveyards'.  Our Best Bites had ones like this but with gummy worms all through them but I couldn't find those so substituted in the headstones instead.  I used Pepperidge Farm cookies and piped the crosses and RIP's on them in melted chocolate (if I had more time I might have dipped the cookies in melted white chocolate to make them all one colour too).  The pudding is packaged pudding mix (I really don't like these but I didn't have time to make it from scratch) topped with crushed Oreo's (I love how the Oreo's really look like dirt!).


So, the only decorating I managed was placing a length of orange fabric under the glass on my dining table and I cut out jack-o-lantern faces for each corner out of black paper.  Quick but it looked cute.  You can see in the background my BOO printout and I remembered I had a glass pumpkin in my cupboard so that was a perfect accent (along with a tiny black cat from Princess E's Pet Palz collection - it even had a tiny little pumpkin under one paw).


We also had fun carving our very first pumpkins with our friends from the US and I cannot find the photos I took of them!!!  So annoyed.  They look so much better in real life than the pictures in magazines even.  The only disappointing thing was that, because it is spring here, they only lasted two days before becoming rotten mouldy messes!

LinkWithin

Related Posts with Thumbnails