Wednesday, April 29, 2009

Brownie love & baking bloopers


I have had a very, very busy week/month/year so far with there not being much sign of it letting up....  

Part of that has been that I have been doing my share of hosting things and my final (for now) 'hosting' event took place this morning and, whilst I love my book club, I have hosted the last three meetings (they are every fortnight) and every single one has coincided with something stressful just before.   The first meeting was the morning after a party for 40 the night before (p.s. NEVER have a big party on a Tuesday night....).   I like to do most of the catering for these things from scratch so more fool me really!   Anyway, I managed to pull off all the salads (I had a little help with the salads to be fair) and desserts for the party as well as a morning tea spread for 10am the next morning for about 25 people.   That was not a fun first round!   The second one found me with one 'ear infected' child and another vomiting child all the night before (thank you dear Hubby for doing most of the night shift!) and, today, the third one came 3 days after another partly self catered party for about 30, an attempt to find a kinder for my youngest and helping some dear friends shift house (not that I did that much, sorry Em & A! - running out of steam....).  

So, here is how last night went:
5pm - cook dinner for starving children, feed aforementioned starving children, bath children etc.
8pm - children in bed
8.10pm - hop on internet for quick look and sit entranced in a semi-conscious tired state
10.45pm - finally force myself to realise that I REALLY need to decide what I am going to cook 
11.45pm - after much toing and froing finally start to actually cook
12.10am - drop a hot pan of melted butter all over cooktop and kitchen floor (I told you I was tired)
12.11am - stand looking at it and realising I am even past the point of being able to cry about it
12.11.35am - dear Hubby comes running, looks at me and hastily runs for a bucket of hot water to clean the floor for me (no, he does not have a single brother!)
12.20am - resume cooking
1.00am - finish both dishes, turn lights out and off to bed!

That 7.30am alarm call came all too fast I can tell you......so, with that in mind, enjoy the picture of my labours and I am outta here and laying on my oh-so-sweet pillow!  Buenos noches...

Thanks all around!

Just a very quick post to say a big THANK YOU to Whip Up for featuring my teacup pincushion tutorial.

A big THANK YOU to FaveCrafts as they also asked me to contribute to their site. Check out my silhouette and Kid's Bag ID tag tutorials over there!


THANK YOU to Craft Gossip for linking to my teacup pincushion as well!


Monday, April 27, 2009

How Turnoff Week went...


I have to say that the turnoff week challenge (read my earlier post here) was actually pretty easy. For the kids. For me? Hmmmm. I don't have a problem with the TV as I hardly ever watch it but my computer?? Well, let's just say it was eye opening to see how often I actually just 'pop up' to my computer space to check on things. What on earth am I checking on so often? Well, you know, there might be some interesting new photos on flickr, what cool stuff is coming up on Google Reader?, any emails from friends?, what is happening with my friends on Facebook (a serious time sucker that one)? and, my personal favourite, to just not be 'Mum' for awhile. I feel like I need to write a disclaimer about how much I love my children etc. but I think we should all know by now that that is a given but I know you understand we ALL need some downtime.

Ok, well, needing downtime aside my great epiphany for the week is that I need some balance with my computer usage. I really love the world of blogging and the outlet this blog gives me but it is getting to the point of mild neglect of my family and that is not something I am comfortable with. So, my pledge at the end of all this is to severely limit my use through the day to a quick email check and enjoy it, guilt free, after the kidlets are in bed. Oh, yes, and to not go to bed too late every night!

I can't wait to hear how everyone else went!


p.s. Thank you to the Choose to Move site for the image I have used.

Saturday, April 25, 2009

Magnets and crayon rocks

Hmm, these two topics aren't related in any way except I just happened to do both these things yesterday. One successfully, one not so much.....


I saw this cute idea for coin magnets in the latest Better Homes & Gardens magazine so made some straight away. So easy and I have been wondering what to do with the bits of foreign currency we have lying around the house. I used very strong magnets that I picked up at a hardware store and some of the coins were attracted to the magnets so I didn't glue those ones. I would suggest using a very strong glue for these. It makes for a fun reminder of your travels! Could be a cute idea for my homemade Christmas present idea list too. Of course, now I have lots of ideas for other things to stick to my magnets....let me know yours!


I have been coveting these crayon rocks (for the kids of course) for awhile now. I just love them. Love their shape and how they make me want to grab them and draw. Sooooo, being the somewhat crafty person that I am, I think to myself 'well, I could probably make those'. You know, just melt some crayons, wait until they have cooled off a bit and mold them with my hands into pebbly type shapes. Sounds easy doesn't it? Well, it sounded easy in my mind when I first thought about it but in reality, the melting in your muffin tin is easy but waiting for them to cool off to the right temperature and consistency is extremely tricky. Then there is the molding part. Not so easy either I found out! A lot of normal, sane people are saying 'well, d'uh' right about now but I am hard to put off when I get an idea in my head. Anyway, here is my one lonely successfully molded attempt. Too lumpy for me and waaaaaay too much effort (again I can hear the 'well, d'uh' comments!). I think I will admit defeat and just buy the darn things....


p.s. Yes, I did notice that it is rather unfortunate that the surviving crayon happens to be THAT colour and the final result looks somewhat like something left in the backyard......lol (c'mon kids, it IS a crayon, really....).

Wednesday, April 22, 2009

Teacup pincushion tutorial


For Earth Day, I did a recycling type craft today (like most people). I have been wanting to do this teacup pincushion for awhile and finally got around to it...


You will need: teacup, fabric, stuffing, needle & thread, glue, scissors and a scrub bud to help keep your pins and needles sharp (this is optional).


Step 1
Cut out circle of fabric. The diameter of my teacup is 10.5cm and the diameter of fabric needed is a little bit more than double that (my circle was 22 - 23cm diameter).


Step 2
Stitch around perimeter of fabric in a long running stitch – no need to knot the end.


Step 3
Gather up the circle about halfway and fill with stuffing (and scrub bud if using) until nice and full. I didn’t overstuff mine as I wanted it to sit down in the cup and not above the lip too much.


Step 4
Pull the gathers as tight as you can at the bottom and tie a knot in the thread before trimming off.


Step 5
Apply liberal amounts of either hot glue or normal tacky craft glue to inside of cup. Firmly press fabric ball into the cup and wait for the glue to dry. Note: Make sure to not get too high up the sides of the cup with the glue so it doesn’t squish out over the fabric. You only need to secure it from underneath.
Only thing left to do is to stick your pins in it now (or box it up for a present of course). I am thinking this one might be one of my handmade Christmas presents for someone...

Tuesday, April 21, 2009

Day Two of Turnoff Challenge


Another easy peasy day as far as reduced screen time....well, to be honest, for the kids anyway (A - 0 minutes, Miss E - 20 mins). I am not doing so well personally! However I am blaming it on my insomnia - what is a girl to do at 5am while everyone is sleeping?


I had such a busy day that not much crafting was done but I did manage to doodle on some rocks quickly. Pretty lame but amused me for a couple of minutes! Looking forward to a quieter day tomorrow......
Sooo tired after being up at 5am (especially seeing as I went to bed at midnight......yes, Katy, night guy got me!!) so I am outta here. Good luck with turnoff time for tomorrow everyone (including myself)!

Monday, April 20, 2009

Day One of Turnoff Challenge


I'll start with the worst bits - there weren't any really! The kids did ask to watch TV/play on the computer a couple of times but weren't too bothered when I said they had used up their time already (first thing this morning!). Considering I had one sick child home from school...not bad!

Other activities done instead: lots of drawing, I finally cleaned up my craft/office area, kids did some bug catching and set up a trap to try and catch a bird (good luck with that one!), lots of outside play (they always do that anyway though), cards made for relatives, reading, stamping and a little bit of sewing. More than has been done in a week! Aims for tomorrow - maybe we will make butter together!

Best comment of the day came when we were sitting together chatting at dinner. My six year old asked how long the turnoff challenge was for (I told her maybe for good!) and then I told her that I enjoyed not having tv for a couple of years when I was a kid. Her response: "did you have funner times without tv in the olden days?" (hence the photo....)

Olden days???? How old do I look????? (breathe, breathe......) Just kidding, made me laugh!

(somewhat related story: a few years ago when my sister and I were driving past our childhood home we pointed it out to my sister's daughter - who was about 7 at the time - and she responded with 'wow, and it is still standing!') That was YOU, darling Jamie, if you read this.......xxx
p.s. I might show Miss E that photo and tell her I am third from the left or something...she will probably believe me!

Turnoff Week Blog Challenge


Ok, I am going to join in the blog challenge being hosted by Unplug Your Kids this week. My kids watch too much tv and I spend waaaay too much time on the computer. I really enjoy blogging but I also do a huge amount of linking, linking, linking and looking at other people's blogs to the point where I am letting things go around here... It is so addictive when there are so many of you amazingly funny, heartwarming and inspiring bloggers out there!! So, anyway, here are my goals for the week:


1. The kids negotiated 1 hr screen time per day (a total for tv, computer games and computer time).


2. I will limit myself to only 1 hr computer time per day. That should give me enough time to check my email, maybe write a blog post and get a little bit of my daily blog surfing fix. The rest of the time I might actually get more craft done (oh, and tidying up of course...)!


Ok, well I have nearly used up half my time already so I am outta here.....

Saturday, April 18, 2009

I love stamps!


I came across this fabulous blog the other day and have been reading her previous posts enthusiastically when I came across this post about making your own stamps from white erasers. Well, I very quickly knocked out this (poor) copy of someone's design (from a very old scrap of eraser I had lying around - as you can see...) and I am hooked!! Get me some more white erasers!! I just used a large stanley knife for this so I think I need the carving tools too now. No, I am SURE I need the carving tools now. I also need to find out where to get those lovely big white slabs her son carved in (how talented is he??). Anyone know?
p.s. if any of my family read this, those books would make an excellent birthday present, hint hint...
p.p.s. if I find the designer of the simple leaf pattern I will post it here soon! I was playing '100 link throughs' and lost track....

Yo yo headband tutorial


I have wanted to do different things with yo-yo's for awhile now and thought this a likely project. I hope you enjoy it too! It was very quick and easy. I will be making a couple more I think.
These are the things you will need: a circle of fabric approx. 17cm diameter, a circle of felt (I would have used my pinking shears if I had them with me but just eyeballed the wobbly edge) approx. 5cm diameter, some pretty buttons, needle and thread, coloured thread if you want the top button to have a colour other than white.
Stitch in a long running stitch around the perimeter of the fabric circle about 5mm in from the edge (no need to knot the end of the thread). Leave a tail of thread where you started. I used a double thread for extra strength for the gathering stage and for sewing it on to the headband.
Do one tie and then pull the threads, gathering as you pull each end of the thread....

until it looks like this, all gathered in the middle. Whilst holding it tight, knot the thread and cut off the extra thread, leaving the needle end still attached.
Place decorative piece of felt and button(s) on top and stitch up through it all. Stitch through all layers to secure.

Stitch to headband securely underneath.


This is with one button and...

this is with an exta decorative button with the contrasting thread. You could use the coloured thread for the whole project if it will be needed for the contrast on the last button.

Thank you One Pretty Thing!

Thanks, Rachel, from One Pretty Thing for featuring me in a daily roundup! I have found so much cool stuff over there. Check them out!

Thursday, April 16, 2009

Hair day and one long overdue project...


I completed a few hair thingy's today (here is one in Miss E's hair). I find them fun to do because they are so quick and satisfyingly cute. I even managed the tutorial for one. If anyone is interested I could do a tutorial for the others as well.

I haven't quite finished with this one. I didn't have any orange thread (I was thinking of using pink thread maybe...) but will use that in the button as well. Or maybe use the little orange sparkly button in the next photo. What do you think? Which one do you prefer?


I also finally finished a little project that has been hanging around for a loooong time. I bought this mason jar expressly for this project from Martha about 3 years ago. Weeell, I have finally done it and, seeing as it took me, oh, about 10 mins, I have to wonder why I haven't done it earlier. Oh well, that is one for the inane mystery books. I am quite happy with how it has turned out although I don't have hot glue and I am not sure if my glue is going to hold.

Ribbon Hairclip tutorial


Well, I had so many steps in this tutorial that I decided to do it as a downloadable PDF. Seems a bit silly for such a tiny little item but there you go...I am nothing if not thorough!


Now, I decided to do this tutorial as a PDF without knowing what was involved in putting one into Blogger. Not so easy I discovered. Anyway I worked out a working solution using Scribd so hope it works ok. I will be interested in any feedback as that will sway my decision as to whether I do it this way again or not. Anyway, you can click on the link below and you can download or print or do multiple things with it there. You might want to open in a new tab or window as I don't think it will do that automatically. (p.s. something happened with the font of the tutorial title during the conversion - will fix that later if I get a chance otherwise I am trusting you can ignore that!)

View Here

Enjoy! (phew)

Wednesday, April 15, 2009

Hairclip beginnings


I love this little hairclip. I made it about a year ago and love seeing Miss E wearing it. Sooo easy to make and such a lot of satisfaction (well for me anyway! - isn't there a saying about the simple things in life? etc. etc.....that is my excuse and I am sticking to it).

I am feeling a hairclip/hairband glut coming up so will try and do a tutorial for this in the next day or so.


On another note, I found out about the Feed Your Soul free art project the other day (can't remember where unfortunately - I was linking, linking, linking...) and think it is amazing. They have started collecting free prints that you can download, print out and frame. Go check it out!

Monday, April 13, 2009

Busy Easter weekend...


Well, we had a full on weekend over Easter. On Good Friday we managed to find our way up to the remains of the fort (with the military museum at the top) and enjoyed the beautiful view over Montevideo.

Saturday I took Miss E for some special Mummy & daughter time shopping to buy some knitting needles as she is desperate to learn (I will have to re-learn myself!) and I thought we could work on this together. She hugged me more than once while we were wandering around the shopping centre to say how much she was enjoying just her and me spending time together. I really, really enjoyed it too and it is obviously something we need to do more of (I miss that intense one on one time together from when she was the only one).


Then yesterday we spent the day at our friends, Dave & Chris', house for the last of 3 easter egg hunts (the best I think - only 6 children and about 200 eggs!) and then spent the majority of the day chatting and lazing around with a cool drink and yummy food while the kids played happily. Bliss.

Friday, April 10, 2009

Bread and butter pudding


I am on a posting roll! Let's just say my family may be getting a teeny bit tired of me directing them to sit still/hold this/stand there so I can take a photo for my blog...or waiting to eat so I can take a photo of food! Oh well, I am having fun and, as they say, if Mum is happy everyone is happy!

Well, last night, as I was getting dinner ready, I got out our day old baguette (aka rock baguette) and decided to try an old remedy for 'refreshing' stale bread as told to me by my dear mother. Apparently her mother used to brush the bread with milk, pop it back into the oven and it would be good as new. Something must have got lost in translation because it didn't work! The baguette had a nice shiny glaze though....

Anyway, I decided to abandon all hope of having baguette slices to dip into our yummy beef and lentil stew and made a bread and butter pudding instead. This is one of the easiest puddings you will ever make and is one of my favourites.


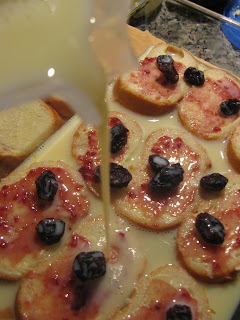
You just get out any old dish that you think will fit most of your bread, add butter and jam to one side of the bread and place face up in the dish. Then sprinkle some sultanas/raisins or any other dried fruit over the bread. I only had these giant raisins that I get here.


Then make up a simple custard mixture (I think mine ended up being about 3 cups of milk, 4 eggs and a heaping 1/4 cup scoop of caster sugar) by whisking the milk, eggs and sugar together until blended well. Pour half over the bottom layer of bread and let sit to soak in for about 10 minutes (crunchy old baguette took quite a while to soak but other bread doesn't take nearly as long).


Then add butter and jam to the next layer of bread and place in the dish face down. Pour the rest of the custard mixture over the top, sprinkle with cinnamon or nutmeg and let sit for awhile to soak again. Every recipe I have seen for this directs you to place this dish in a water bath but I never do and it turns out fine. Cook in a moderately slow oven (160 degrees celsius) for about 45 mins.


Here is the yummy looking toasty golden end product.


Sometimes the top will puff up quite alarmingly at the end of the cooking time but this falls back down as it cools. Then you can just scoop out the delicious bready custardy goodness and enjoy! Nice with vanilla icecream too. You can use any bread for this. Sliced, bread rolls, fruit bread, croissants, brioche etc. You get the idea.

Happy Easter!


Well we had a busy day yesterday, fun wise. Firstly, we made chocolate chip cookies (like the ones I have made before many many times), then hot cross buns and then nature journals.

The hot cross buns almost didn't turn out as I was a little impatient getting them out of the oven but popped them back in and all was saved! Thankfully all that rising and waiting time wasn't in vain....I just loooove them hot from the oven with a little bit of butter melting into them.

I have been wanting to do this for awhile so finally found a couple of old but empty exercise books to use as nature journals. We covered them in pretty paper (Miss E also decorated hers beautifully), gathered a few supplies (crayons, pencils, sticky tape, clipboard, camera) and set out in the back yard.


Here are our leaf rubbings - we loved doing these.


I was thrilled to find this beetle 'skin' cast off on the trunk of a tree to show the kids.


We also added a feather each. A is a little young for this activity but he helped collect leaves and just generally followed us around enjoying being outside.

I think we will use Miss E's library bag as a hold-all for our nature journals and supplies and we can take it with us on outings to the park etc.
I might set up a nature table next...

LinkWithin

Related Posts with Thumbnails