Wednesday, July 29, 2009

Desk organiser from recycled tin cans - tutorial


Finally, I have some crafty goodness happening! I have been missing it a lot. I have done a tutorial on how to transform basic food tins into a cute and functional desk organiser. This is one of my favourite crafts actually - there is recycling, there is (mostly) 'free' and there is wow 'before and after' factor! All great elements for crafting.

I have done the tutorial as a PDF download. Click here for your copy and make sure you let me know if you make one yourself.

Notes:
- I don't have access to good quality spray paints but I think a Rustoleum paint would give much better coverage.
- If you want the option of changing the look of your tin, just wrap the paper around and secure with double sided tape.

Friday, July 17, 2009

Party favours


Just a quick post today. Princess E had her party with her school friends yesterday so I made some little party favours (the full on party bag thing doesn't happen here - yay!). This is a very simple one obviously. I had some of these little cellophane bags (they are really cheap to buy in bulk and come in handy for so many things - the size here is 100 x 190 mm). I put in three homemade chocolate chip cookies, turned the top of the bag over and secured it with a little piece of tape and added the folded scrapbooking paper at the top. For the paper top, I measured the right width and cut them all out using my rotary guillotine (thank you Sandra) then folded them, trimmed the edges with scalloped edge scissors, placed it over the cellophane and stapled them on. I would have normally punched two holes and threaded ribbon through for a prettier effect (instead of staples) but I don't have any ribbon and haven't been able to find an easy supply here. Then I printed off some labels with the little message and stuck them on the front. Easy peasy! The kids really loved them too.

Well, in keeping with my less than prolific posting lately, we are heading off to visit an 'estancia' (like what we would call a farm stay in Australia) over the weekend so I won't be back until after that. We should all have sore butt's next week from horseriding! Yee ha!

Sunday, July 12, 2009

Cards and paper flower balls

Wow, two blog posts in a row.... Well, I haven't had much of a chance to do much craft for myself (or blogging!), as per my previous post, but this last weekend was Princess E's birthday and Father's Day so a couple of cards were in order and I did some 'party decorating' upon Princess E's request.


This is my card for Princess E - a scrapbooking paper pinwheel on printed paper with the sentiment 'Have a whirly good Birthday!'. I absolutely love how this turned out and she loved it too, more importantly.


I made this card for the kids to give for Father's Day. I used one of Princess E's art project drawings for inside the square and then printed off the frame border with repeating phrases of 'we love you daddy...happy father's day...'. I also made a border with a white background and purple writing which I think I liked a little bit better but Princess E liked this one (and Lord A couldn't have cared less).

This is the birthday card my super talented niece made and sent for Princess E. I love, love, love her work. I am only sad that it got wet in transit and is a little distorted.


This is a little picture she did for me as well. How did she know I actually covet a pair of shoes just like that!


This is my attempt at a tissue paper flower ball as seen around various blogs and magazines (I originally saw them on Martha - here are the instructions). I couldn't find tissue paper here in Uruguay so I had to try and think of an alternative seeing as I had my heart set on doing one for Princess E's birthday. Well, I have used paper napkins here and they really aren't ideal but I am happy with the final effect. It turned out pretty well, considering, I think. Yellow is her favourite colour of the moment so I decorated the dining room all in yellow and white with streamers and balloons and the paper flower ball. I hung crepe paper streamers right across the whole doorway (hanging like a curtain) for her and the kids have had a blast running through them all weekend. I might even leave it up for awhile as it is cheering me up in the middle of winter right now.

I am hoping to get some crafty goodness happening around here in the very near future. DH came back from his extended business trip with half a suitcase of craft supplies (what a man - shopping in a craft store for me!). Woo hoo! He bought the lino cutters and stamp making slabs so I am going to have to decide on a design to carve a proper stamp now. That is the hard part - narrowing down which design to do. I will keep you posted on my progress!

Kid's stuff


Well, not much happening on the crafty side for me during the school holidays so this post is all about the various things I have been doing with the kids. I have wanted to try these collage type pictures for awhile. I like it!

Far left row: I sometimes run out of inspiration for drawing and, for those times when Princess E does too, I decided to put together an 'art inspiration' folder. All of these projects came from the wonderful blog Art Projects for Kids. I will keep adding to it as I come across things that interest us. It really worked brilliantly for Princess E and I had fun doing them with her too. Below is a bigger photo of our finished artworks. I am going to expand this idea for craft projects and activities folders as well. Much easier than searching through bookmarked pages on my web browser when boredom sets in.


Middle row top & middle: This picture is an art project I was trying to get Lord A interested in. I thought he might like this as he is easily frustrated and I was trying to match it to his toddler skill level. I folded a piece of drawing paper in half and on one side I drew a few dots and on the other a few dashes whilst showing him to see if that would help get him started. He did a few of them and was very happy when he managed to do a few dots without tails but his interest waned quickly after that. So, instead of him getting into mischief while Princess E and I continued with our artistic pursuits, I got out a tray, some bowls, dried beans and a few utensils to scoop back and forwards with. He really enjoyed this much more and progressed it to include a matchbox car to hide amongst the beans. I think I could get some mileage (ha! - no pun intended) out of this activity by changing the texture medium (ie. use lentils, then rice, etc.). He would get the absolute most fun out of flour I think but I am not brave enough to let him loose on that! I find it hard to think of art & craft things for Lord A to do as he doesn't tend to enjoy the things that Princess E and I do naturally so I have to try and think of things from his perspective instead. This will save us both a lot of frustration! I think I need to think of things that have more of an experimentation nature to them. We have always called him our little explorer so I guess that part of his personality will help guide me.

Middle Row bottom: This is the beginning of a papier mache world for Princess E's Littlest Pet Shop toys. There has been some frustration in getting it going (me being too impatient with E's skill level really - my own fault) but I will post about it once it is finished. I can see some application for Lord A's interests here. He is obsessed by bumps (is this a boy thing??). Anywhere, anyhow. Bumps in flooring, little dirt hills in the backyard, the bumps you can feel when walking on a grate and so on. Any variation in flooring brings about the most intense concentration. He loves nothing more than a bump in the rug for him to drive his cars over. I might see if I can make a little model for him complete with hills and bridges. Don't know why I haven't thought of this before!

Far right row: We had moments of 'I'm bored - what can I do' inevitably over the holidays so Princess E and I sat down and made an 'activity suggestion jar' one rainy day. She came up with most of the activities so we can utilise this from now on. The last picture shows some juggling balls I made for the kids. I made a lot more but they have been flung far and wide over the house and I couldn't find them all for the photo. These are super duper easy to make (just balloons and lentils). Anyone interested in a tutorial? I might do one in the next few days.

Well, that concludes some of our art & crafty fun here for the holidays. I hope you find some inspiration there to help you through some future holidays too.

Thursday, July 2, 2009

Coloured 'sand' jars & painted rocks


Ok, just a quickie to show you a couple of activities we have done this week. It was a cold rainy day here on Monday so I pulled out my activity 'star attraction' for the week. Coloured 'sand' jars (thanks to Ramblings of a Crazy Woman)!


Basically you get a bag or salt and divide it into different ziploc bags and then add food colouring. Half the fun is in smooshing the bag around to distribute the colour evenly (reading back at the instructions - you are supposed to pour them out to let them dry which I forgot to do - maybe that is why the colours are 'bleeding' a little in our jars). Then I poured the colours out into different little bowls and gave the kids some jars to start layering their colours with. The final effect is one of those touristy coloured sand jars. They loved it and it kept them going for a while - bowls being replenished regularly. Even my 3 yr old had no problems with these. I am sure they would have kept going if I hadn't run out of jars! I should have grabbed out some glasses, I wasn't thinking.


We also painted a few rocks. Here are a couple of our examples. Princess E's ladybug is just waiting for some eyes now...maybe we will do some more today.


Saturday, June 27, 2009

What we do when Daddy is away...


I have been MIA lately because DH has been away on an extended business trip. It is hard for me to get any crafting done myself but here is what I have been up to with the kids to try and pass the time until Daddy gets home. We made this sign when DH went on an extended trip last year (while we were still in Malaysia - which is why the home looks very different). I used an A4 sheet of paper for each letter and drew an outline for the first few and then Princess E took over once she had the idea. She then coloured in each letter, we hole punched the corners and threaded some thick string through. I used Command 3M removable hooks to hang it across the doorway (I love those things!). I hope I kept it and can find it for this welcome home this coming week! Otherwise I am sure Princess E will have fun making another one. Lord A the III might even join in this time.


In the meantime, Lord A has been doing simple sticker pictures (office supply sticker sheets and black paper - he also did some using coloured paper and page reinforcers - the little round white stickers - but I didn't get a photo of that one yet)...this is a great arty craft for the littlies.


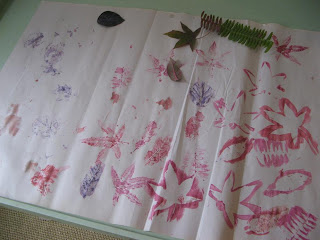
and leaf stamping.


I have had this large box hanging around since we moved last year and it has taken on many forms. It was a house for awhile, then a cave, and here I have set it up on it's side so they could hammer nails into it (the moving carton cardboard is thick enough to provide some resistance but still makes it easy enough for even a 3 yr old). I got this idea from the fabulous Filth Wizardry (don't you love that name?). Then this turned into another game of one hiding inside and trying to grab the nails I would be pulling out for them to hammer again. Then Lord A was playing with it for quite awhile before I checked on him and this is what I found....


He had emptied the shelves of whatever he could find and deposited it in the 'window'....as you do. Little darling...


We also made our own primitive little stamps by sticking adhesive backed foam shapes onto cardboard squares. They don't make the best stamps but it was fun doing them and just mucking around anyway.


We have been cooking our own homemade pizza (doing the dough from scratch - the kids love kneading!). Yum. (forgive the bad photo - taken at night under electric light)


I have also been making jigsaw puzzle sandwiches with the kids for their lunches. Such a simple idea (from Martha) but they absolutely love it! We just used a shaped cookie cutter in the centre and cut out to the edges in a few different spots. The kids love doing the cookie cutter part and then I scramble it before I put it on the table for them to put back together.

Anyway, we have another week to go, and school holidays just started, so my posting will be light on for awhile...

Saturday, June 20, 2009

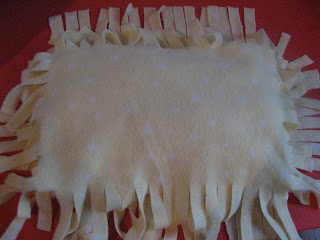
No-sew fringed cushion cover tutorial


This has to be the easiest cushion cover you will ever make. I remember seeing the instructions for this from a project sheet from my local Spotlight store in Brisbane (Australia) I think many years ago. Anyway, here is how you can do it! This is a great quick project for a teen or younger too. There are some great polar fleece prints out there. (forgive the less than stellar lighting for my photos - very rainy day here today)

All you need is your cushion insert, some polar fleece and a pair of scissors.


I just eyeballed my measurements but you need to lay out a double thickness of the polar fleece and cut out a generous band around your cushion. Of course, you could make yourself a pattern after measuring your cushion and working out what length you want for fringing but I went for quick and cheerful today (especially with a 3 yr old in tow) and just eyeballed it. The end result doesn't really need such careful measuring.


After you cut around your cushion, cut out each of the four corners (like so)....


and cut the remaining sides into strips.


Separate your two layers and put the cushion inside.


Match up your side lengths of fringe and tie each pair of them (twice) up close to the cushion. Just do this all the way around and then you have your fringed edge cushion with not a needle in sight! I quite like a long fringe but just experiment with the length you want. You can always trim them off after you have finished if they are a bit long for your liking.


Wednesday, June 17, 2009

Father's Day is coming...


I think Father's Day is next month down here in Uruguay but I believe in the US it is this coming weekend? In Australia it isn't until September. Anyway, here are a few ideas and what the kids will be making for their Daddy.

The photo above is his present from 3 years ago - it is just each of our handprints on a bought canvas. I got David to do his handprint first weeks before so he forgot about it and it was a surprise on the day. The thing I love about this photo is that A was not yet a year old and hated anything on his hands so I had to quickly smoosh his hand in the paint and squish it on to the canvas before he had time to scream too much. Talk about child abuse! I think his little smooshy hand print is adorable (but I am biased).

This pencil cup is what the kids will be making this year. You can get the instructions from Busy Bee Kid's Crafts here. I am going to spray paint a leftover food tin first and probably cover it with a nice 'manly' patterned paper before letting the kids cut and paste.


A tradition I started a few years ago is one of David's favourite presents. Every year I take a photo of the kids with a sign saying, first with only Miss E, 'I love you Daddy' and now, with the two of them 'We love you Daddy'. He has a flip top desk calendar at work that the photos go into. How I am going to get the kids to do it when they are teenagers is anybody's guess (but I suspect bribery will be involved).


I am also keen on this idea over at Martha. I just need to find a note cube....


LinkWithin

Related Posts with Thumbnails