I am on a tea related roll it seems (see my teacup pincushion from earlier).
Well, this project was inspired by the best present I ever received. For my birthday one year my wonderful husband cut out a bunch of tiny little hearts and wrote a quality that he loved about me on each one and then put them all in a little box. How sweet was that! So, I have adapted this for teabag tags and I did two versions. One with little sayings of what you love about the recipient of your gift and the other with funny/witty quotes to brighten up their day. I love both equally so this is definitely going into my list of handmade christmas present ideas.
I have done this as a PDF for download as well. A few more photos and prettier layout!
Step One
Remove the paper tag from your teabags.
Step Two
Use the teabag tag size for your guide. You can print out quotes on paper to cut out and layer on pretty scrapbook paper or, as in the plain orange example, you can just cut a rectangle out to fold around the string.
Step Three
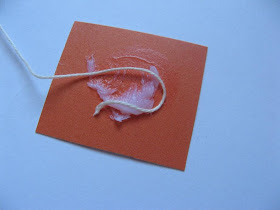
I just used a glue stick to glue it all but made sure I got a good squishy dollop on it so it would hold the string reasonably firmly. You don't need superglue when you consider how long it will be used for! Warning: just make sure your quotes are up the right way before you glue...and, no, I didn't actually do this but just thought it could be easy to do!
Step Four
Let dry and pop a bunch into a teacup or a pretty box for a personal and thoughtful gift!
Of course, now I have lots of other ideas for variations on this. You could make the tag into a circle shape or a flower shape or whatever large craft punch shape you have on hand....etc... I would love to see what anyone else comes up with so please let me know and link back!


Oh, what a great idea! These would go great with your teacup pincushions!
ReplyDeleteOooh...what if you made a faux teabag, as well, full of itty bitty notions...like a little sack of buttons, or a vintage bobbin, or a thimble...that would make such a great set!!
What a great idea for teachers! Thanks for sharing.
ReplyDeleteThat makes teatime even more soothing! Fab tutorial catherine!
ReplyDeleteThat is such a wonderful idea - and so unique ! My sister is a tea lover - I'll be using this idea for her birthday next month. :-)
ReplyDeleteThis is genius! Quick and easy. Nice close up photo guide too. I can see them with little black and white photos on one side and a quote on the other. I think my mom will be getting these for Mother's Day.
ReplyDeletecheers!
Oooh what a really good idea!
ReplyDeleteThanks so much everyone! I love the suggestion of doing it for teachers. I am going to ask my daughter to do some little drawings and handwritten sayings and scan them onto tags for her teachers at the end of the year. Now I am going to finally get around to checking out all of your blogs!
ReplyDeleteAHHHHH so glad I found this post! I saw it back when you first posted it and thought, "I should do that for my grandmother for Christmas." I am JUST now thinking about it again and was seriously stressing when i couldn't find it!
ReplyDeleteThanks for the idea!
I love this idea so much! It is so thoughtful.
ReplyDeleteA cute idea. I wonder how it would go if you just glued your own tags over the top of the existing one. It might save a bit of fiddling around.
ReplyDelete